Wednesday, March 29, 2017

Amazon Web Services Tech Essential Day

Amazon Web Services (AWS) Tech Essential Day
Join for Amazon Web Services (AWS) Tech Essential Day! This free, one-day event will be delivered by AWS Education’s technical instructors
Tech Essential Day is based on the Instructors sessions and self-paced labs. The program will take you through a step-by-step deep-dive into AWS core services such as Compute, Storage, Database and Network.
Self-paced labs help you learn how to work with AWS services so you can gain confidence with the AWS platform. Each lab walks you through step-by-step instructions to complete a pre-designed scenario using the AWS Console in a live practice environment. At the end of the session, you will be able to build and deploy scalable and secure applications on the AWS Cloud.

Why you should attend:
•Gain practical, hands-on experience working with technology in a practice environment
•Explore and experiment with new products
•Acquire new and practical skills in a convenient, flexible, and consumable format
•Learn how to deploy and automate your infrastructure on the AWS Cloud
•Network with the AWS team and your industry peers
•Get your questions answered by our AWS experts

Who should attend:
•Technical Users: Developers, Engineers, System Administrators and Architects
•Decision Makers: IT Managers, Directors and Business Leaders

Venue:
City Date Venue
Ahmedabad April 4 Hyatt Regency Ahmedabad, 17/A, Ashram Road Ahmedabad -500016
Hyderabad April 4 ITC Kakatiya, 6 -3 -1187, Begumpet, Hyderabad Telangana, India – 500016
Chandigarh April 6 Hyatt Regency, 178, Industrial and Business Park, Phase 1, Chandigarh – 160 002
Gurgaon April 11 Hyatt Regency, NH8, Sector 83, Gurgaon, Haryana 122004,
Indore April 18 Radisson Blu, 12 Scheme No 94C, Ring Road, Indore, Madhya Pradesh 452010
Nagpur April 20 Radisson Blu, Radisson Blu Hotel Nagpur, 7 Wardha Road, Nagpur, Maharashtra 440015
Chennai April 25 HILTON, 124/1 J.N.Salai Guindy Chennai 600032

REGISTER>>

Tuesday, May 17, 2016

How to Shrink MySQL ibdata1 Size

In MySQL, when you are using InnoDB, all the tables and indexes are stored under the MySQL system tablespace.
MySQL system tablespace is ibdata1, which is located under /var/lib/mysql
The single ibdata1 file contains all the tables and indexes in your MySQL database. So, if you have a big database, this file size will grow really big.
In this tutorial, we’ll explain how to rebuild your entire MySQL database, and break the big MySQL system tablespace file into small individual MySQL table files.

mysql ibdata1

1. Big MySQL (and MariaDB) System Tablespace

There is a major drawback with the default big MySQL system tablespace approach.
Take this scenario as an example: You’ve uploaded 100GB worth of data into multiple tables in your MySQL.
Now, the ibdata1 file size will be around 100GB+.
# cd /var/lib/mysql

# ls -lh ibdata1
-rw-r-----. 1 mysql mysql 101G Jan 21 21:10 ibdata1
After few days, you deleted around 50GB worth of data from all those tables. The ibdata1 file size will not be reduced to around 50GB+, it will still stay at around 100GB+.
In the above case, later when you add 10GB worth of data to the tables, the ibdata1 file size doesn’t grow to 110GB, and stays at 100GB. Because, the file still has the unused space inside from the above 50GB of deleted data.
The problem is, you can’t reclaim those unused space after you delete the 50GB of data from ibdata1 file. There is a way to do it, but is too complicated (explained below), and involves taking the MySQL database down.
So, how do we avoid storing all the tables and indexes in a single ibdata1 file; instead store in multiple table files individually?

2. Set the innodb_file_per_table parameter

For this, you should use innodb_file_per_table parameter inside your /etc/my.cnf file under the “mysqld” section as shown below:
# vi /etc/my.cnf
[mysqld]
innodb_file_per_table
Note: If you are using MySQL 5.6.6 (or MariaDB) and higher, the above is the default setting.
In this example, on CentOS 6, the default MySQL that you get when installing from yum repository is still 5.1.73 as shown below.
# mysql --version
mysql  Ver 14.14 Distrib 5.1.73, for redhat-linux-gnu (x86_64) using readline 5.1
So, in this case, we should set the innodb_file_per_table in the my.cnf file.
Anytime you make any changes to my.cnf, you should restart the MariaDB MySQL database.
service mysqld restart
Note: For some reason if you want to set this parameter while the database is running, and don’t want to shutdown MariaDB, you can do the following set global from the mysql prompt.
mysql> set global innodb_file_per_table=1;

3. New Tables (and index) as individual files

From now on, when you create a new MySQL table, you’ll get individual files.
In this example, I created a new table called employee and uploaded around 20GB worth of data into it.
mysql> use database

mysql> create table employee ...

mysql> insert into employee ..
Two things will happen here:
First, it will create a subdirectory with the database name “database” under the /var/lib/mysql directory
# ls -l /var/lib/mysql/
drwx------. 2 mysql mysql   266240 Jan  5 12:11 database
..
Second, under this database directory name (i.e under database directory), you’ll see individual file EMPLOYEE.IBD getting created. The
 size of this file will be the size of the data that you uploaded only 
to that table. In this case, since we uploaded 20GB worth of data into 
this table, the EMPLOYEE.IBD filesize is around 20GB as shown below.
# cd /var/lib/mysql/database/

# ls -lh 
-rw-r-----. 1 mysql mysql  21G Jan 21 21:17 employee.ibd
Note: If you are using MyISAM database, you’ll see individual .MYD, .FRM and .MYI files

4. Extract existing tables from ibdata1

Next, if you want to extract an existing table from ibdata1 to it’s own individual file, then you have to optimize the table.
Let us say you have a table called benefits under database. This benefits table was created before we set the innodb_file_per_table in the my.cnf.
So, the benefits table will still be under ibdata1 file. To move this out of ibdata1 into it’s own IBD file, we have to optimize the table as shown below.
mysql> use database

mysql> optimize table benefits;
This will create the following individual file for the benefits table.
# cd /var/lib/mysql/database/

# ls -lh 
-rw-r-----. 1 mysql mysql  21G Jan 21 21:17 benefits.ibd
In this example, keep in mind that the original ibdata1 file still did not shrink. It is still around 100GB.
# ls -lh /var/lib/mysql/ibdata1
-rw-r-----. 1 mysql mysql 101G Jan 21 21:10 ibdata1
Note: You can also do the following.
mysql> alter table benefits engine=InnoDB;

5. Shrink ibdata1 File Size

Keep in mind that the ibdata1 still remains the same 101G size, it didn’t reduce the size yet.
# ls -lh /var/lib/mysql/ibdata1
-rw-r-----. 1 mysql mysql 101G Jan 21 21:10 ibdata1
To shrink the ibdata1 file, you need to perform the following steps:

6. Backup the Database

First, temporarily stop mysql database, and take a cold backup of the whole database. In case something goes wrong, you can use this cold backup to restore.
mkdir /backup

cd /var/lib

cp -r mysql /backup
Second, take a mysqldump backup of all the database.
mysqldump -u root -ptmppassword --all-databases > /backup/all-database.sql

7. Drop all your database

Next, drop all your database one by one. To view all the database to be dropped, use “show databases”
mysql> show databases;
+--------------------+
| Database           |
+--------------------+
| information_schema |
| database           |
| sales              |
| mysql              |
+--------------------+
In this example, we are dropping two databases (database and sales) that exist in the mysql.
# mysql -u root -ptmppassword
mysql> drop database database;

mysql> drop database sales;
Note: Do not drop information_schema and mysql database.

8. Delete ibdata and ib_logfile

Next, shutdown the MySQL database.
service mysqld stop
Next, remove the ibdata1 file and all the individual ib_logfile* files:
cd /var/lib/mysql/

rm ibdata1

rm ib_logfile0

rm ib_logfile1

9. Import all the Database

Note: At this point, you should already have the following in your my.cnf file.
[mysqld]
innodb_file_per_table
Start the MySQL database.
service mysqld start
Import all the database from the mysqldump backup that we took earlier.
mysql -u root -ptmppassword --all-databases < /backup/all-database.sql
At this stage, the ibdata1 file, which is the MySQL system tablespace will be created from scratch, and in our example, it will not be 100GB anymore.
Now ibdata1 will be only few MB in size. All the database tables will be stored as individual files under the corresponding database subdirectory under /var/lib/mysql/

What is BPaaS Business Process Model Solution on Cloud Computing

Using cloud computing, we can access various business and consumer applications as tools or utilities over the internet.
It allows us to create, modify and customize the business applications online.
Cloud computing can be broadly classified into the following two models:

1. Deployment Model

This model define the access type of clouds. In other words, this defines where exactly the cloud is located, and its access restrictions.
  • Public cloud
  • Private cloud
  • Community cloud
  • Hybrid cloud

2. Service Models

The following are different service models available:
  • Infrastructure as a service (IaaS): IaaS like Amazon Web Services provides virtual server instance to start, stop, and access and modify their virtual servers and storage.
  • Platform as a service (PaaS): PaaS provides the runtime environment for applications, development & deployment tools, etc.
  • Software as a service(SaaS): SaaS model allows to use software applications as a service to clients.

Introduction to Business Process Model

1. SCOR – Supply Chain Operations Reference

This model is developed and maintained by the supply chain council (SCC). The SCOR model is reference models that can be used improve supply chain operations. SCOR provide a basic process modeling tool, an extensive benchmark database, and defines a set of supply chain metrics to a company.
The software ARENA is a tool that can be used for simulation modeling in various applications. An integration of SCOR and ARENA provides the supply chain analyst with a comprehensive and dynamic tool.
SCOR is used to study the static operations of a supply chain. There is also a need to study the dynamic effects e.g. changes in production rate, poor quality in raw materials.
SCOR - supply chain operations reference

2. DCOR – Design-Chain Operations Reference-model

This is a tool for design-chain management. DCOR enables users to address, improve and communicate design-chain management practices within interested parties. It describes product development and research but does not describe sales and marketing (demand generation) and post-delivery customer support.
Like SCOR, the DCOR model is organized around five primary management processes: Plan (Design Chain), Research, Design, Integrate and Amend.
DCOR - Design-Chain Operations Reference-model

3. ITIL – Information Technology Infrastructure Library

This concept is the most widely used for IT Service Management because it is scalable. ITIL provides a practical framework for identifying, planning, delivering and supporting IT services to the organization.
ITIL version 3 have five important volumes:
  1. Service Strategy
  2. Service Design
  3. Service Transition
  4. Service Operations
  5. Continual Service Improvement

BPaaS – Business Process as a Service

BPaaS is business over cloud. Lot of companies deliver their services over the internet using cloud computing from different companies like Amazon, Google, IBM etc.
BPaaS is a business process which delivers a service through cloud solutions. With BPaaS one or more business processes are uploaded together to a cloud service that performs simultaneously and BPaaS monitors them.
Along with providing economic profit and ease using of service, BPaaS provide an additional features like service testing. In this feature user can test various services before integrating that services in business process or there is also an option for replacing service from an existing services.
Every business consist of infrastructure, software, platform, products, etc.
So, BPaaS includes IaaS, Paas and SaaS.
BPaaS is an type of process which delivery based on cloud service models. These cloud services include Software as a Service (SaaS), Platform as a Service (PaaS), and Infrastructure as a Service (IaaS); are therefore dependent on related services. The BPaaS comes on top of the cloud services: SaaS, PaaS, and IaaS as shown below.
BPaaS - Business Process as a Service
BPaaS has the following advantages:
  • Decreased costs from not buying and maintaining servers
  • Increased mobility by accessing the service from any location, which allows business to grow and expand faster.
  • Reliable security
  • Easy to scale as the business expands

Wednesday, February 3, 2016

Reducing IO waits on Ubuntu for MYSQL 5.6

Dear All,
I was continuously receiving IO waits high usage alerts for our MYSQL 5.6 DB servers running on Ubuntu servers and so checked lots of things to reduce IOs like optimizing queries and shifting database on SAS disks.
But not got any success so tried to split table data (partitioning) but the business logic was not supporting it so started doing RND to reduce IO waits on Ubuntu servers.
And finally got solution and all were happy J
Added below line in MY.CNF
innodb_flush_method =  O_DSYNC
Benefits got after adding the line
  • Reduced IO waits
  • Reduce memory usage of database server

Configure Website on Remote share…

To configure Websites on Web farm in traditional way we copy all websites on all web servers and configure websites and a synchronization mechanism.
This process requires disk space per server to keep website and the delay of synchronization.
So given a thought can we save the disk space and synch delay and done a RnD by following below steps to overcome all these dependencies
First tried to configure Website from remote share and got below error

After lots of efforts got sucess ..

  1. Share the Websites folder on MASTER server by giving full control to DOMAIN\appuser account
  2. Open Command Prompt ( run as administrator )
  3. Traverse c:\windows\microsoft.net\framework\v.x.xxxxx\ folder


  1. caspol -m -ag 1. -url “file://\\10.10.10.131\websites\*” FullTrust
” The Code Access Security POLicy tool enables users and administrators to modify security policy for the machine policy level, the user policy level, and the enterprise policy level. ”
On Master server

  1. now open IIS manager ( Inetmgr )
  2. Click on Website for which we want to configure remote share website
  3. From right panel click on Basic Settings and edit the path of website as
  4. Now click on connect as button and enter domain\appuser account details
  5. Then click on test settings ( ensure all is green )
  6. In website feature panel.. Authentication tab … anonymous authentication should run under domain\appuser account.
  7. Now go in Application Pool tab
  8. Ensure application pool is running under domain\appuser account
  9. Recycle the application pool / reset IIS
  10. Browse the website J
The master server is ready; now follow Step 4 to Step 14 in sequence on all remaining web servers

REPAIR Corrupted Pen Drive

One day morning when I was trying to copy some data on my pen drive of 2 GB , suddenly I got message as “You need to format the disk …” and on screen it was popup like below .


So I clicked on Format disk button I got below screen on which I clicked on OK


Still got same error , I though the disk become unusable so tried for second option of Diskpart command as below

Start cmd


Then “list disk ” to get the disk no for further process. ( its disk 2 in my case)
So followed below set commands for DISK 2 ( which is my Flash drive )


As soon as the format got completed


Thanks to DISKPART … saved my Pen drive.

403.18 Cannot execute requested URL in the current application pool

Due to heavy load on web site which is configured on webfarm in remote share environment started giving below error on all servers.

After lot of googling also I haven’t got any appropriate solution

So tried below steps and it worked 
  1. Created new app pool with same framework and credentials.
  2. Assigned the newly created pool to the website
  3. Tried by browsing and it started working.
So according to my experience we need to created new app pool to resolve the 403.18 Error.

Import all Websites and application pools by Exporting it from IIS7.5

Task:Create new server with all the pre-configured settings with IIS web server.

Scenario:-
I want to create replica server for all my website with preconfigured apppool setttings.

Actions Taken:-
  1. Taken remote of web server.
  2. Exported all Application Pools from the Server with below command
%windir%\system32\inetsrv\appcmd list apppool /config /xml > c:\apppools.xml

  1. Exported all Websites along with Applications ( Virtual Directories ) with below command
%windir%\system32\inetsrv\appcmd list site /config /xml > c:\sites.xml

  1. Copied both the files from DR webserver to newly formatted C: \
  2. Then Task is to import all application pools and Websites in IIS 7.5
  3. To do so first open INETMGR and delete all Applications and default Website from it ( as its newly formatted we don’t have any important website configured on it)
  4. First Import Application pools which can be done with below command on CMD
%windir%\system32\inetsrv\appcmd add apppool /in < c:\apppools.xml

  1. Then import all Websites along with Applications to do so use below command
%windir%\system32\inetsrv\appcmd add site /in < c:\sites.xml

  1. After all done , IISReset /stop and then IISReset /start
 

Wednesday, December 9, 2015

Centralizing Windows Logs

You can use the tools in this section to centralize your Windows Event Log from many servers or desktops. By properly administering your logs, you can track the health of your systems while keeping your log files secure, and filter their contents for finding the correct information.
Centralizing your logs saves time and increases the reliability of your log data. When Windows log files are stored locally on each server, you have to individually log into each one to go through them and look for any errors or warnings. If the server is unresponsive you might be out of luck. If you aren’t sure which servers are affected, you have to hunt through each one, which could take a long time on larger networks. The log files are also safer in a centralized location because even when your instances are terminated or your files are deleted (intentionally or unintentionally), the centralized backup copies of your logs are unaffected.
It’s possible for a Windows server to forward its events to a “subscribing” server. In this scenario the collector server can become a central repository for Windows logs from other servers in the network.
We will now see how that’s done in seven steps described below. These steps work on both Windows Server 2008 R2 and Windows Server 2012.

Example System
First, let’s describe our example system. We are using two Active Directory Domain–joined Windows Server 2012 systems. The domain name is MYTESTDOMAIN.COM and as shown in the figure below, the machines are both registered with the domain.
One of the servers, called MYTESTSQL, hosts a SQL Server 2014 instance. The other machine, called MYTESTSERVER, will work as an event log subscriber. It will be used to centralize all SQL Server related logs from MYTESTSQL. We will call MYTESTSQL the “source” and MYTESTSERVER the “collector.”
Setup Steps

1. Enable the Windows Remote Management Service

EVF_AD_Servers
To begin with, remotely log into the source computer (MYTESTSQL) as a local or domain administrator and open a command prompt. Execute the following command:
This enables Windows Remote Management service in the source server. If it has already been running, you will receive a message like this:

Command Prompt

2. Configure the Windows Event Collector Service
Next, remotely access the collector machine (the centralized log collector, MYTESTSERVER) as a local or domain administrator. Again, open a command prompt and execute the following command:wecutil qcIn the prompt that comes up, as shown below, press y:
Command Prompt

3. Configure the Event Log Readers Group
Once the commands have been run successfully, go back to the event source computer and open the Computer Management applet from the Server Manager. Once that starts, expand the Local Users and Groups node from the navigation pane and select the Groups folder.Double click on the “Event Log Readers” group. Once the dialog box appears, click Add.

EVF_Add_EventLogReader_Group

In the “Select Users, Computers, Service Accounts or Groups” dialog box, click on the “Object Type” button and select the checkbox for “Computers” and click OK (shown below):

EVF_Add_EventLogReader_Group

Type “MYTESTSERVER” and click on the “Check Name” button. If the computer account is found, it will be confirmed with an underline. Click OK and then OK again. This will close the dialog box shown below:

EVF_Add_EventLogReader_Group

4. Configure Windows Firewall
If the source computer is running Windows Firewall, make sure it’s allowing Remote Event Log Management and Remote Event Monitor traffic, as shown below:
Allowed apps

5. Create a Subscription
Next, start the Event Viewer application in the collector server (MYTESTSERVER) and select the Subscription node. From the Action menu in the right pane, choose the “Create Subscription…” link.

EVF_Create_Subscription

The following images show the options to choose in the Subscription Properties dialog box that appears:
a. Provide a name and description for the subscription.
b. Leave the “Destination log” field set to default value of Forwarded Events.
c. Choose the first option (“Collector initiated”) for subscription type and then click on the “Select Computers…” button.

mytestsql events

d. Click on the “Add Domain Computers…” button in the dialog box that pops up.
e. Type the name of the source server (MYTESTSQL) and verify the name. Click OK twice to come back to the Subscription Properties main dialog box.

Computers

f. In the Events to collect section, click on the “Select Events…” button to bring up the Query Filter window.
g. Select Last 24 hours from the “Logged” drop-down list.
h. Select all the types of events (Warning, Error, Critical, Information, and Verbose).
i. Choose the option “By log” and in the drop-down list, select the tick box beside Application.Basically we want the remote server to forward all application events that happened in the last 24 hours.
j. Click OK to come back to the Subscription Properties main dialog box again.

Query Filter

k. Click on the “Advanced…” button and then in the Advanced Subscription Settings dialog box select the option for “Machine Account” if it’s not already selected.
l. Change the “Event Delivery Optimization” option to “Minimize Latency.”
m. Leave the Protocol to default value of HTTP and the Port to 5985.
n. Click OK to go back to the Subscription Properties dialog box and then click OK to close it.

Advanced subscription Setting

The Subscription node in the collector computer’s event viewer should now show the subscription we just created.

Subscriptions

6. Verify Events on Collector Computer
If we now select the Forwarded Events node, we will see this:

Event Viewer

The column “Computer” now shows the events are from the remote computer MYTESTSQL.MYTESTDOMAIN.COM.You can enable or disable the collector subscription by right-clicking on the subscription and choosing “Disable” from the pop-up menu. When disabled, the status of the subscription is shown as disabled in the main window.An active collector subscription doesn’t mean it’s succeeding. To see if the collector can connect to the source, right click on the subscription and choose “Runtime Status” from the pop-up menu. In the image below, we can see the collector can’t connect to the source. By default it retries every five minutes:
Subscription Runtime Status

If all is OK, subscription run-time status shows a green tick with an active status:

Subscription Runtime Status

Wednesday, November 18, 2015

Move or copy an SSL certificate from a Windows server to another Windows server

If you have multiple Windows servers that need to use the same SSL certificate, such as in a load-balancer environment or using a wildcard or UC SSL certificates, you can export the certificate to .pfx file and import it on a new Windows server. This may also be necessary when you switch hosting companies. We will go over the exact process with step-by-step instructions in this article. If necessary, you can copy the SSL certificate to an Apache or other type of server.
We will assume that you have already successfully installed the SSL certificate on one Windows web server. You will follow these steps to move or copy that working certificate to a new server:
  1. Export the SSL certificate from the server with the private key and any intermediate certificates into a .pfx file.
  2. Import the SSL certificate and private key on the new server.
  3. Configure your web sites to use them in IIS.
On a Windows server you will need to export your certificate from the MMC console to a .pfx file with your private key. You can then copy that .pfx file to the new Windows server and import it. The following screenshots are from a Windows Server 2008 machine but any differences for Windows Server 2003 are noted.

Export the certificate from the Windows MMC console

Note: These instructions will have you export the certificate using the MMC console. If you have Windows Server 2008 (IIS7) you can also import and export certificates directly in the Server Certificates section in IIS. Click here to hide or show the images
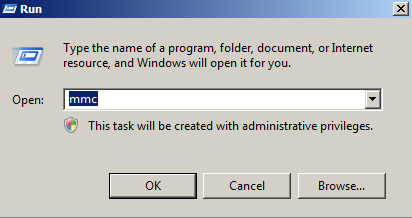
  1. Click on the Start menu and click Run.
  2. Type in mmc and click OK.
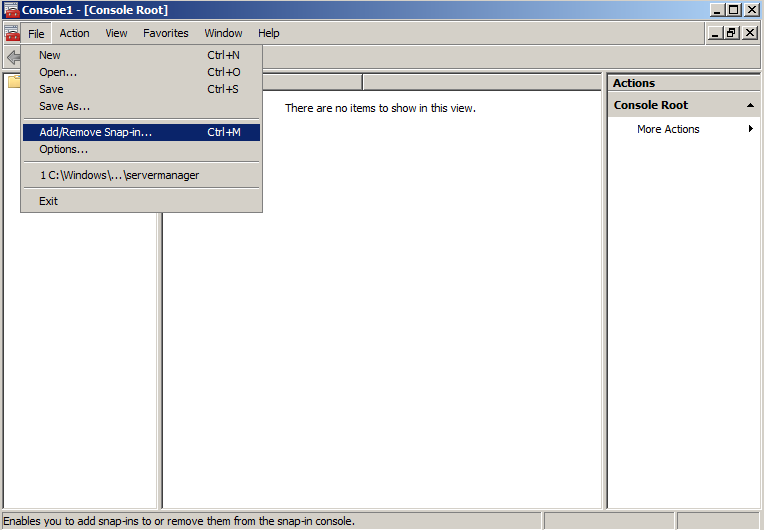
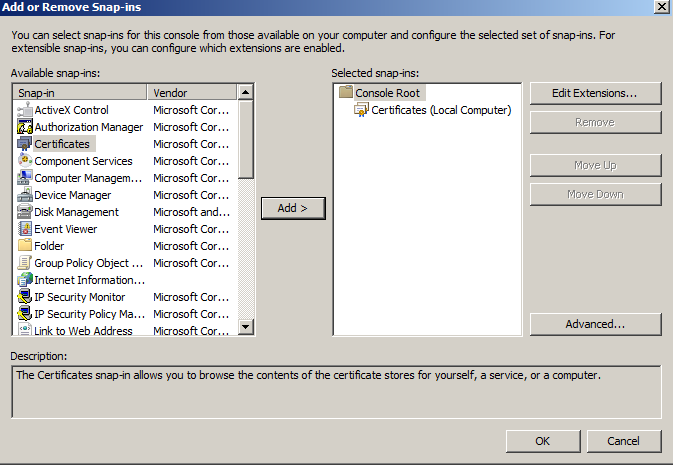
  3. Click on the File menu and click Add/Remove Snap-in...
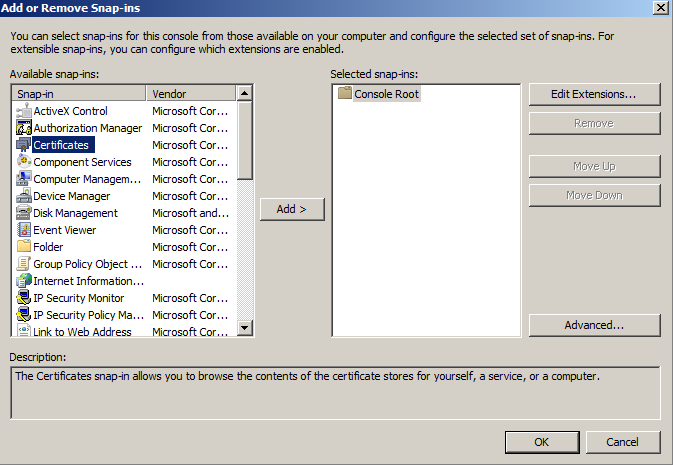
  4. If you are using Windows Server 2003, click on the Add button. Double-click on Certificates.
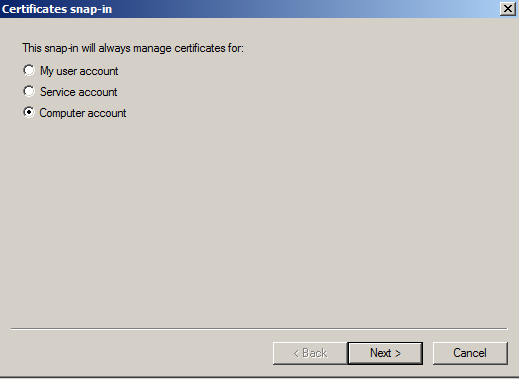
  5. Click on Computer Account and click Next.
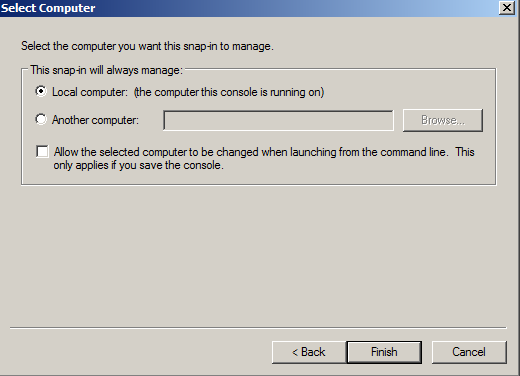
  6. Leave Local Computer selected and click Finish.
  7. If you are using Windows Server 2003, click the Close button. Click OK.
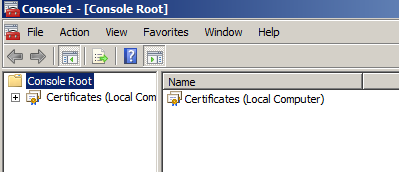
  8. Click the plus sign next to Certificates in the left pane.
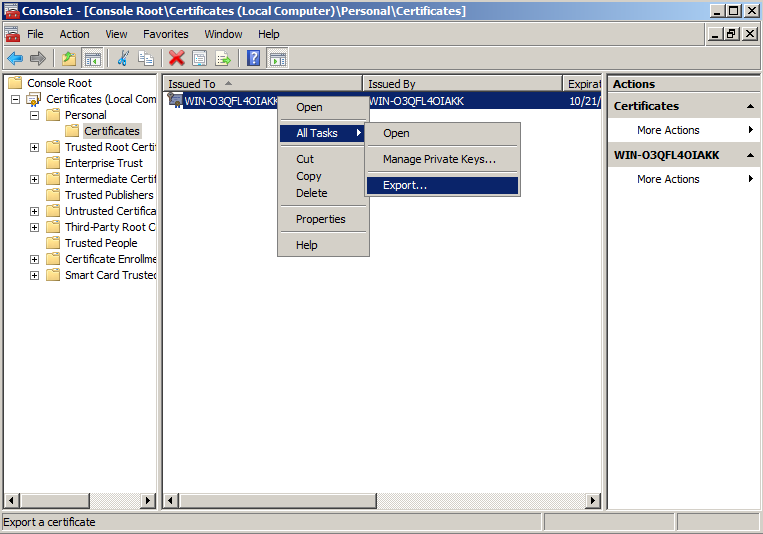
  9. Click the plus sign next to the Personal folder and click on the Certificates folder. Right-click on the certificate you would like to export and select All Tasks and then Export...
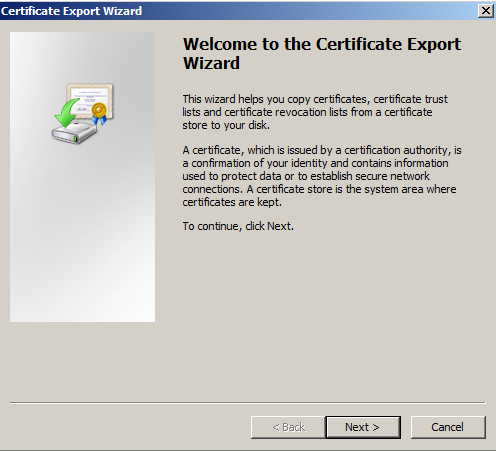
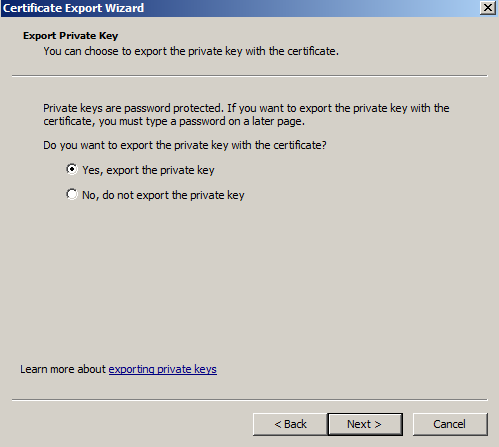
  10. In the Certificate Export Wizard click Next.
  11. Choose "Yes, export the private key" and click Next.
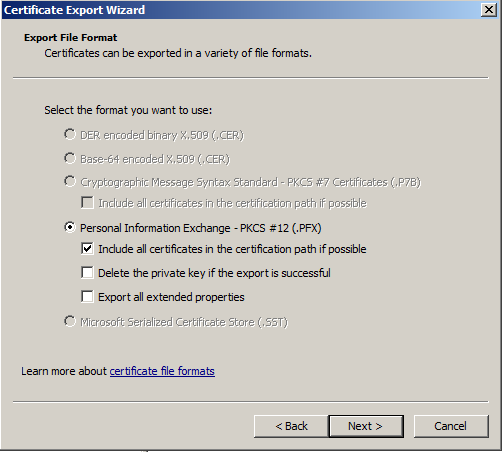
  12. Click the checkbox next to "Include all certificates in the certification path if possible" and click Next.
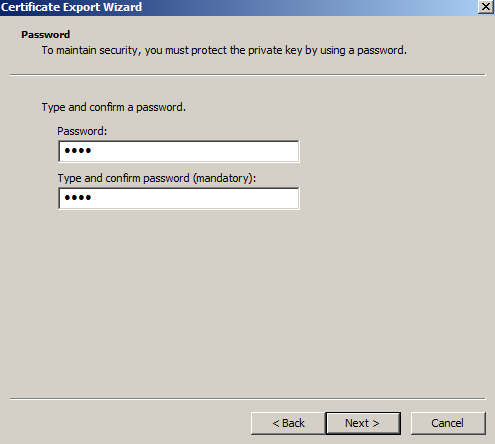
  13. Enter and confirm a password. This password will be needed whenever the certificate is imported to another server.
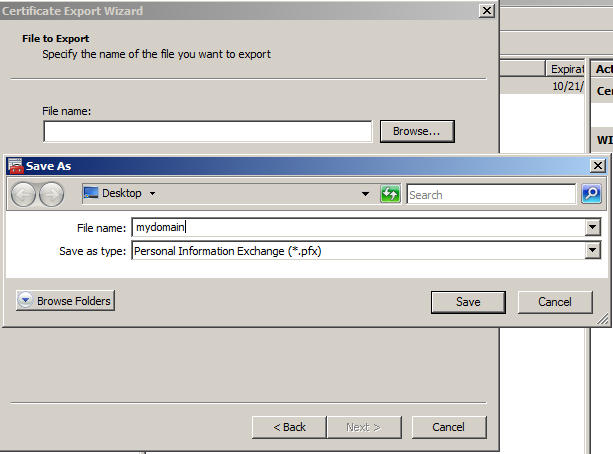
  14. Click Browse and find a location to save the .pfx file to. Type in a name such as "mydomain.pfx" and then click Next.
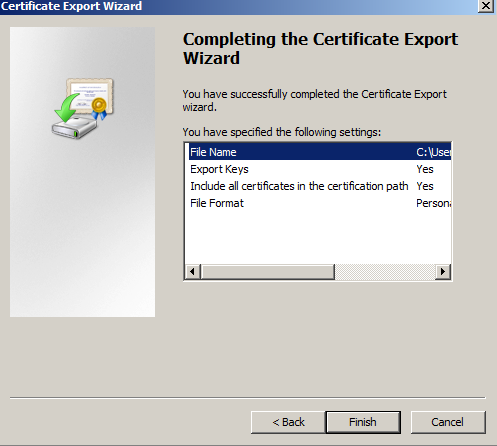
  15. Click Finish. The .pfx file containing the certificates and the private key is now saved to the location you specified.

Import the certificate in the Windows MMC console

After you have exported the certificate from the original server you will need to copy the .pfx file that you created to the new server and follow these import instructions.
  1. Click on the Start menu and click Run.
  2. Type in mmc and click OK.
  3. Click on the File menu and click Add/Remove Snap-in...
  4. If you are using Windows Server 2003, click on the Add button. Double-click on Certificates.
  5. Click on Computer Account and click Next.
  6. Leave Local Computer selected and click Finish.
  7. If you are using Windows Server 2003, click the Close button. Click OK.
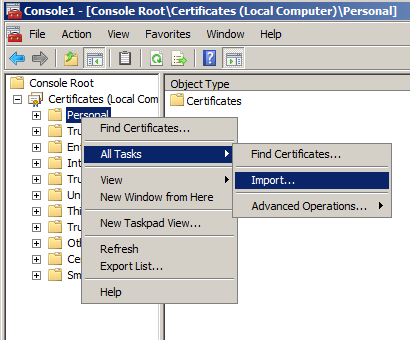
  8. Right-click on the Personal folder and select All Tasks and then Import...
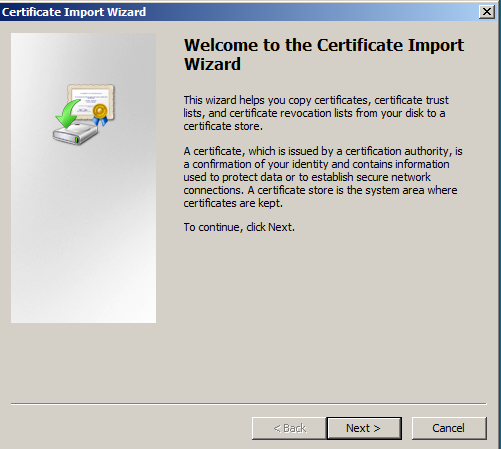
  9. In the Certificate Import Wizard click Next.
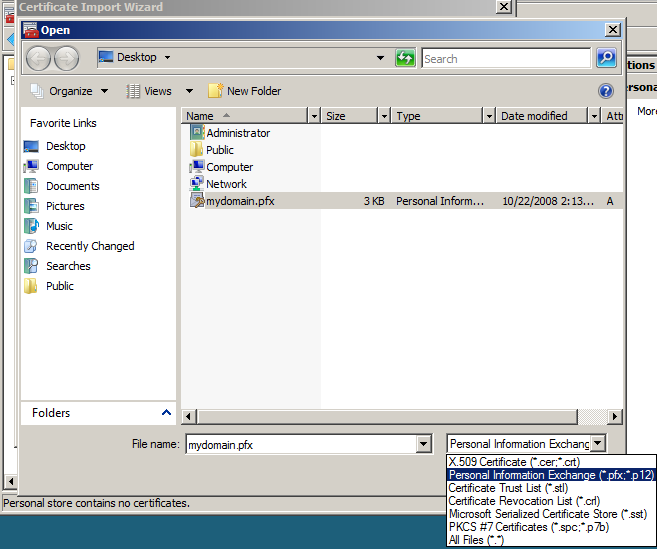
  10. Click the Browse button and change the file type from "X.509..." to "Personal Information Exchange (*.pfx, *.p12)". find the .pfx file that you copied over and click Open and then Next.
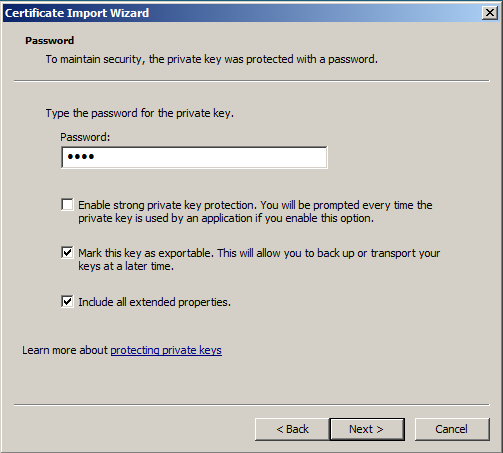
  11. Enter the password that you set when you exported the .pfx file and click "Mark this key as exportable" so you can export the certificate from this machine as well as the original. Click Next.
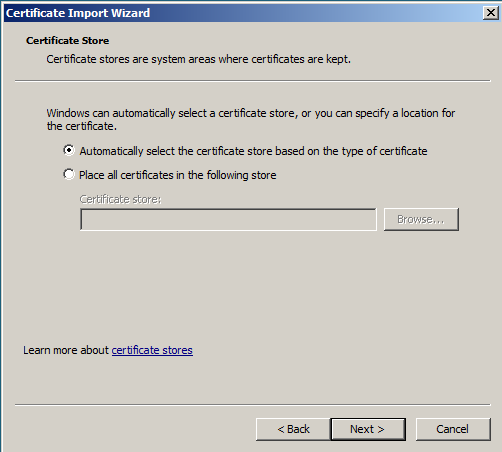
  12. Click "Automatically select the certificate store based on the type of certificate" and click Next.
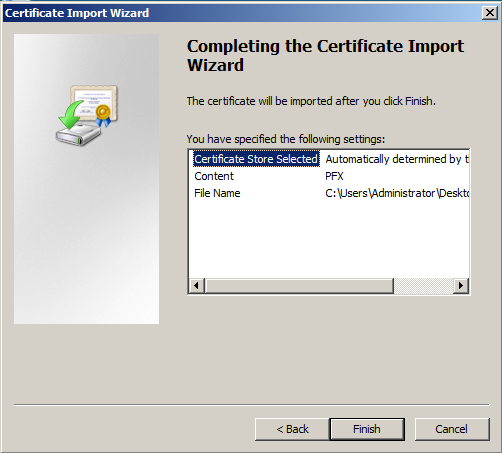
  13. Click Finish to complete the wizard.
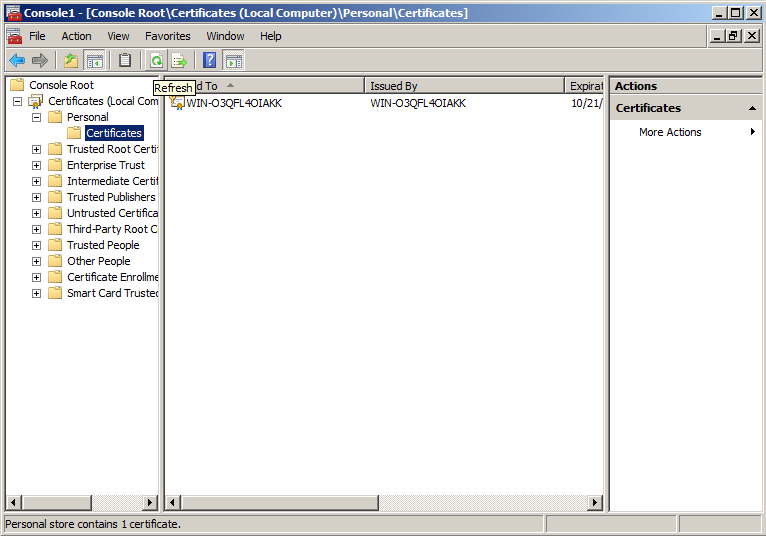
  14. You can now click the Refresh button in the toolbar to refresh and find your certificate in the Certificates folder under Personal. You can verify that it was imported correctly by double-clicking it and looking for "You have a private key that corresponds to this certificate" at the bottom of the certificate dialog.
  15. Close the MMC console. You do not need to save any changes.

Assigning the SSL certificate

After you have imported the .pfx file, you will either need to assign the certificate in IIS, enable the certificate for the services you need in Exchange or select the certificate in any other software that you are using. Because IIS is the most common place to use SSL certificates, we have included the instructions for assigning a website to use the new certificate in IIS 6 (Windows Server 2003). If you have Windows Server 2008, just follow the binding part of the IIS 7 SSL Certificate Installation instructions.
  1. In IIS, right-click on the website that needs the certificate and click on Properties.
  2. Click the Directory Security tab and click on the Server Certificate button to run the server certificate wizard.
  3. If you already have a certificate on that website you will need to remove it and then start the wizard again.
  4. Click "Assign an existing certificate" and click Next.
  5. Select the new certificate that you just imported and click Next.
  6. Click Finish. You may need to restart IIS for the certificate to start working with the assigned website.