Wednesday, December 9, 2015

Centralizing Windows Logs

You can use the tools in this section to centralize your Windows Event Log from many servers or desktops. By properly administering your logs, you can track the health of your systems while keeping your log files secure, and filter their contents for finding the correct information.
Centralizing your logs saves time and increases the reliability of your log data. When Windows log files are stored locally on each server, you have to individually log into each one to go through them and look for any errors or warnings. If the server is unresponsive you might be out of luck. If you aren’t sure which servers are affected, you have to hunt through each one, which could take a long time on larger networks. The log files are also safer in a centralized location because even when your instances are terminated or your files are deleted (intentionally or unintentionally), the centralized backup copies of your logs are unaffected.
It’s possible for a Windows server to forward its events to a “subscribing” server. In this scenario the collector server can become a central repository for Windows logs from other servers in the network.
We will now see how that’s done in seven steps described below. These steps work on both Windows Server 2008 R2 and Windows Server 2012.

Example System
First, let’s describe our example system. We are using two Active Directory Domain–joined Windows Server 2012 systems. The domain name is MYTESTDOMAIN.COM and as shown in the figure below, the machines are both registered with the domain.
One of the servers, called MYTESTSQL, hosts a SQL Server 2014 instance. The other machine, called MYTESTSERVER, will work as an event log subscriber. It will be used to centralize all SQL Server related logs from MYTESTSQL. We will call MYTESTSQL the “source” and MYTESTSERVER the “collector.”
Setup Steps

1. Enable the Windows Remote Management Service

EVF_AD_Servers
To begin with, remotely log into the source computer (MYTESTSQL) as a local or domain administrator and open a command prompt. Execute the following command:
This enables Windows Remote Management service in the source server. If it has already been running, you will receive a message like this:

Command Prompt

2. Configure the Windows Event Collector Service
Next, remotely access the collector machine (the centralized log collector, MYTESTSERVER) as a local or domain administrator. Again, open a command prompt and execute the following command:wecutil qcIn the prompt that comes up, as shown below, press y:
Command Prompt

3. Configure the Event Log Readers Group
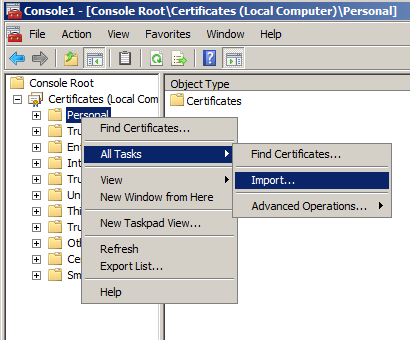
Once the commands have been run successfully, go back to the event source computer and open the Computer Management applet from the Server Manager. Once that starts, expand the Local Users and Groups node from the navigation pane and select the Groups folder.Double click on the “Event Log Readers” group. Once the dialog box appears, click Add.

EVF_Add_EventLogReader_Group

In the “Select Users, Computers, Service Accounts or Groups” dialog box, click on the “Object Type” button and select the checkbox for “Computers” and click OK (shown below):

EVF_Add_EventLogReader_Group

Type “MYTESTSERVER” and click on the “Check Name” button. If the computer account is found, it will be confirmed with an underline. Click OK and then OK again. This will close the dialog box shown below:

EVF_Add_EventLogReader_Group

4. Configure Windows Firewall
If the source computer is running Windows Firewall, make sure it’s allowing Remote Event Log Management and Remote Event Monitor traffic, as shown below:
Allowed apps

5. Create a Subscription
Next, start the Event Viewer application in the collector server (MYTESTSERVER) and select the Subscription node. From the Action menu in the right pane, choose the “Create Subscription…” link.

EVF_Create_Subscription

The following images show the options to choose in the Subscription Properties dialog box that appears:
a. Provide a name and description for the subscription.
b. Leave the “Destination log” field set to default value of Forwarded Events.
c. Choose the first option (“Collector initiated”) for subscription type and then click on the “Select Computers…” button.

mytestsql events

d. Click on the “Add Domain Computers…” button in the dialog box that pops up.
e. Type the name of the source server (MYTESTSQL) and verify the name. Click OK twice to come back to the Subscription Properties main dialog box.

Computers

f. In the Events to collect section, click on the “Select Events…” button to bring up the Query Filter window.
g. Select Last 24 hours from the “Logged” drop-down list.
h. Select all the types of events (Warning, Error, Critical, Information, and Verbose).
i. Choose the option “By log” and in the drop-down list, select the tick box beside Application.Basically we want the remote server to forward all application events that happened in the last 24 hours.
j. Click OK to come back to the Subscription Properties main dialog box again.

Query Filter

k. Click on the “Advanced…” button and then in the Advanced Subscription Settings dialog box select the option for “Machine Account” if it’s not already selected.
l. Change the “Event Delivery Optimization” option to “Minimize Latency.”
m. Leave the Protocol to default value of HTTP and the Port to 5985.
n. Click OK to go back to the Subscription Properties dialog box and then click OK to close it.

Advanced subscription Setting

The Subscription node in the collector computer’s event viewer should now show the subscription we just created.

Subscriptions

6. Verify Events on Collector Computer
If we now select the Forwarded Events node, we will see this:

Event Viewer

The column “Computer” now shows the events are from the remote computer MYTESTSQL.MYTESTDOMAIN.COM.You can enable or disable the collector subscription by right-clicking on the subscription and choosing “Disable” from the pop-up menu. When disabled, the status of the subscription is shown as disabled in the main window.An active collector subscription doesn’t mean it’s succeeding. To see if the collector can connect to the source, right click on the subscription and choose “Runtime Status” from the pop-up menu. In the image below, we can see the collector can’t connect to the source. By default it retries every five minutes:
Subscription Runtime Status

If all is OK, subscription run-time status shows a green tick with an active status:

Subscription Runtime Status

Wednesday, November 18, 2015

Move or copy an SSL certificate from a Windows server to another Windows server

If you have multiple Windows servers that need to use the same SSL certificate, such as in a load-balancer environment or using a wildcard or UC SSL certificates, you can export the certificate to .pfx file and import it on a new Windows server. This may also be necessary when you switch hosting companies. We will go over the exact process with step-by-step instructions in this article. If necessary, you can copy the SSL certificate to an Apache or other type of server.
We will assume that you have already successfully installed the SSL certificate on one Windows web server. You will follow these steps to move or copy that working certificate to a new server:
  1. Export the SSL certificate from the server with the private key and any intermediate certificates into a .pfx file.
  2. Import the SSL certificate and private key on the new server.
  3. Configure your web sites to use them in IIS.
On a Windows server you will need to export your certificate from the MMC console to a .pfx file with your private key. You can then copy that .pfx file to the new Windows server and import it. The following screenshots are from a Windows Server 2008 machine but any differences for Windows Server 2003 are noted.

Export the certificate from the Windows MMC console

Note: These instructions will have you export the certificate using the MMC console. If you have Windows Server 2008 (IIS7) you can also import and export certificates directly in the Server Certificates section in IIS. Click here to hide or show the images
  1. Click on the Start menu and click Run.
  2. Type in mmc and click OK.
  3. Click on the File menu and click Add/Remove Snap-in...
  4. If you are using Windows Server 2003, click on the Add button. Double-click on Certificates.
  5. Click on Computer Account and click Next.
  6. Leave Local Computer selected and click Finish.
  7. If you are using Windows Server 2003, click the Close button. Click OK.
  8. Click the plus sign next to Certificates in the left pane.
  9. Click the plus sign next to the Personal folder and click on the Certificates folder. Right-click on the certificate you would like to export and select All Tasks and then Export...
  10. In the Certificate Export Wizard click Next.
  11. Choose "Yes, export the private key" and click Next.
  12. Click the checkbox next to "Include all certificates in the certification path if possible" and click Next.
  13. Enter and confirm a password. This password will be needed whenever the certificate is imported to another server.
  14. Click Browse and find a location to save the .pfx file to. Type in a name such as "mydomain.pfx" and then click Next.
  15. Click Finish. The .pfx file containing the certificates and the private key is now saved to the location you specified.

Import the certificate in the Windows MMC console

After you have exported the certificate from the original server you will need to copy the .pfx file that you created to the new server and follow these import instructions.
  1. Click on the Start menu and click Run.
  2. Type in mmc and click OK.
  3. Click on the File menu and click Add/Remove Snap-in...
  4. If you are using Windows Server 2003, click on the Add button. Double-click on Certificates.
  5. Click on Computer Account and click Next.
  6. Leave Local Computer selected and click Finish.
  7. If you are using Windows Server 2003, click the Close button. Click OK.
  8. Right-click on the Personal folder and select All Tasks and then Import...
  9. In the Certificate Import Wizard click Next.
  10. Click the Browse button and change the file type from "X.509..." to "Personal Information Exchange (*.pfx, *.p12)". find the .pfx file that you copied over and click Open and then Next.
  11. Enter the password that you set when you exported the .pfx file and click "Mark this key as exportable" so you can export the certificate from this machine as well as the original. Click Next.
  12. Click "Automatically select the certificate store based on the type of certificate" and click Next.
  13. Click Finish to complete the wizard.
  14. You can now click the Refresh button in the toolbar to refresh and find your certificate in the Certificates folder under Personal. You can verify that it was imported correctly by double-clicking it and looking for "You have a private key that corresponds to this certificate" at the bottom of the certificate dialog.
  15. Close the MMC console. You do not need to save any changes.

Assigning the SSL certificate

After you have imported the .pfx file, you will either need to assign the certificate in IIS, enable the certificate for the services you need in Exchange or select the certificate in any other software that you are using. Because IIS is the most common place to use SSL certificates, we have included the instructions for assigning a website to use the new certificate in IIS 6 (Windows Server 2003). If you have Windows Server 2008, just follow the binding part of the IIS 7 SSL Certificate Installation instructions.
  1. In IIS, right-click on the website that needs the certificate and click on Properties.
  2. Click the Directory Security tab and click on the Server Certificate button to run the server certificate wizard.
  3. If you already have a certificate on that website you will need to remove it and then start the wizard again.
  4. Click "Assign an existing certificate" and click Next.
  5. Select the new certificate that you just imported and click Next.
  6. Click Finish. You may need to restart IIS for the certificate to start working with the assigned website.

Thursday, July 30, 2015

How To Set Up Master Slave Replication in MySQL

About MySQL replication

MySQL replication is a process that allows you to easily maintain multiple copies of a MySQL data by having them copied automatically from a master to a slave database. This can helpful for many reasons including facilating a backup for the data,a way to analyze it without using the main database, or simply as a means to scale out.
This tutorial will cover a very simple example of mysql replication—one master will send information to a single slave. For the process to work you will need two IP addresses: one of the master server and and one of the slave.

This tutorial will use the following IP addresses:
12.34.56.789- Master Database
12.23.34.456- Slave Database

Setup

This article assumes that you have user with sudo privileges and have MySQL installed. If you do not have mysql, you can install it with this command:
sudo apt-get install mysql-server mysql-client

Step One—Configure the Master Database

Open up the mysql configuration file on the master server.
sudo nano /etc/mysql/my.cnf

Once inside that file, we need to make a few changes.
The first step is to find the section that looks like this, binding the server to the local host:
bind-address            = 127.0.0.1

Replace the standard IP address with the IP address of server.
bind-address            = 12.34.56.789 

The next configuration change refers to the server-id, located in the [mysqld] section. You can choose any number for this spot (it may just be easier to start with 1), but the number must be unique and cannot match any other server-id in your replication group. I’m going to go ahead and call this one 1.
Make sure this line is uncommented.
server-id               = 1

Move on to the log_bin line. This is where the real details of the replication are kept. The slave is going to copy all of the changes that are registered in the log. For this step we simply need to uncomment the line that refers to log_bin:
log_bin                 = /var/log/mysql/mysql-bin.log

Finally, we need to designate the database that will be replicated on the slave server. You can include more than one database by repeating this line for all of the databases you will need.
binlog_do_db            = newdatabase

After you make all of the changes, go ahead and save and exit out of the configuration file.
Refresh MySQL.
sudo service mysql restart

The next steps will take place in the MySQL shell, itself.
Open up the MySQL shell.
mysql -u root -p

We need to grant privileges to the slave. You can use this line to name your slave and set up their password. The command should be in this format:
GRANT REPLICATION SLAVE ON *.* TO 'slave_user'@'%' IDENTIFIED BY 'password';

Follow up with:
FLUSH PRIVILEGES;

The next part is a bit finicky. To accomplish the task you will need to open a new window or tab in addition to the one that you are already using a few steps down the line.
In your current tab switch to “newdatabase”.
USE newdatabase;

Following that, lock the database to prevent any new changes:
FLUSH TABLES WITH READ LOCK;

Then type in:
SHOW MASTER STATUS;

You will see a table that should look something like this:
mysql> SHOW MASTER STATUS;
+------------------+----------+--------------+------------------+
| File             | Position | Binlog_Do_DB | Binlog_Ignore_DB |
+------------------+----------+--------------+------------------+
| mysql-bin.000001 |      107 | newdatabase  |                  |
+------------------+----------+--------------+------------------+
1 row in set (0.00 sec)

This is the position from which the slave database will start replicating. Record these numbers, they will come in useful later.
If you make any new changes in the same window, the database will automatically unlock. For this reason, you should open the new tab or window and continue with the next steps there.
Proceeding the with the database still locked, export your database using mysqldump in the new window (make sure you are typing this command in the bash shell, not in MySQL).
mysqldump -u root -p --opt newdatabase > newdatabase.sql

Now, returning to your your original window, unlock the databases (making them writeable again). Finish up by exiting the shell.
UNLOCK TABLES;
QUIT;

Now you are all done with the configuration of the the master database.

Step Two—Configure the Slave Database

Once you have configured the master database. You can put it aside for a while, and we will now begin to configure the slave database.
Log into your slave server, open up the MySQL shell and create the new database that you will be replicating from the master (then exit):
CREATE DATABASE newdatabase;
EXIT;

Import the database that you previously exported from the master database.
mysql -u root -p newdatabase < /path/to/newdatabase.sql

Now we need to configure the slave configuration in the same way as we did the master:
sudo nano /etc/mysql/my.cnf

We have to make sure that we have a few things set up in this configuration. The first is the server-id. This number, as mentioned before needs to be unique. Since it is set on the default (still 1), be sure to change it’s something different.
server-id               = 2

Following that, make sure that your have the following three criteria appropriately filled out:
relay-log               = /var/log/mysql/mysql-relay-bin.log
log_bin                 = /var/log/mysql/mysql-bin.log
binlog_do_db            = newdatabase

You will need to add in the relay-log line: it is not there by default. Once you have made all of the necessary changes, save and exit out of the slave configuration file.
Restart MySQL once again:
sudo service mysql restart

The next step is to enable the replication from within the MySQL shell.
Open up the the MySQL shell once again and type in the following details, replacing the values to match your information:
CHANGE MASTER TO MASTER_HOST='12.34.56.789',MASTER_USER='slave_user', MASTER_PASSWORD='password',
MASTER_LOG_FILE='mysql-bin.000001', MASTER_LOG_POS=  107;

This command accomplishes several things at the same time:
  1. It designates the current server as the slave of our master server.
  2. It provides the server the correct login credentials
  3. Last of all, it lets the slave server know where to start replicating from; the master log file and log position come from the numbers we wrote down previously.
With that—you have configured a master and slave server.
Activate the slave server:
START SLAVE;

You be able to see the details of the slave replication by typing in this command. The \G rearranges the text to make it more readable.
SHOW SLAVE STATUS\G

If there is an issue in connecting, you can try starting slave with a command to skip over it:
SET GLOBAL SQL_SLAVE_SKIP_COUNTER = 1; SLAVE START; 
 
All done.

Wednesday, July 29, 2015

Setup VSFTPD with custom multiple directories and (virtual) users accounts on Ubuntu

How to do it

  • Install vsftpd and a PAM library
  • Edit /etc/vsftpd.conf and /etc/pam.d/vsftpd
  • Create user accouts with custom directories (in /var/www/ for example)
  • Set directories with the correct chmod and chown
  • Create a admin user with full access to the server
  • Troubleshoot

1. Install vsftpd (Very Secure FTP Deamon) and libpam-pwdfile to create virtual users

I wanted to create FTP users but I didn’t want to add local unix users (no shell access, no home directory and so on). A PAM (Pluggable Authentication Modules) will help you create virtual users.
 
sudo apt-get install vsftpd libpam-pwdfile

2. Edit vsftpd.conf

First you need to back up the original file

sudo mv /etc/vsftpd.conf /etc/vsftpd.conf.bak

Then create a new one
sudo vim /etc/vsftpd.conf

Copy and paste the following lines. The file should ONLY contain these lines:
 
listen=YES
anonymous_enable=NO
local_enable=YES
write_enable=YES
local_umask=022
nopriv_user=vsftpd
virtual_use_local_privs=YES
guest_enable=YES
user_sub_token=$USER
local_root=/var/www/$USER
chroot_local_user=YES
hide_ids=YES
guest_username=vsftpd

3. Register virtual users

To register a user you use htpasswd, so I assume you have apache2 working on your server. Create a vsftpd folder then put configuration files in it.
 
sudo mkdir /etc/vsftpd

then
sudo htpasswd -cd /etc/vsftpd/ftpd.passwd user1
  • -c means that we’ll create the file if it’s not existing yet
  • -d forces MD5, you need it on ubuntu 12.04, just use it always The command will prompt for a password.
If you want to add new users afterwards:
 
sudo htpasswd -d /etc/vsftpd/ftpd.passwd user2

4. Configure PAM in /etc/pam.d/vsftpd

Again, you need to back up the orignal file
 
sudo mv /etc/pam.d/vsftpd /etc/pam.d/vsftpd.bak

and create a new one
sudo vim /etc/pam.d/vsftpd

Copy and paste these 2 lines (this should be the only content). I insist only these 2 lines, I wasted a lot of time keeping the originals and just added these.
 
auth required pam_pwdfile.so pwdfile /etc/vsftpd/ftpd.passwd
account required pam_permit.so

5. Create a local user without shell access

sudo useradd --home /home/vsftpd --gid nogroup -m --shell /bin/false vsftpd

You can check that it’s been created with the id command: id vsftpd. We define the user with the /bin/false shell because of the check_shell parameter (even if you don’t use it).

6. Restart vsftpd

The common way is using init.d like all deamon
sudo /etc/init.d/vsftpd restart

In Ubuntu 12.04 there is something new with services. It worked on my 12.04 but not on my 10.04 one. To be honest I’m not a Linux expert (yet) so I can’t explain why. Something to do with Upstart I think.
sudo service vsftpd restart

7. Create directories

According to your configuration all users will be placed into this folder: /var/www/user1.
You need to create them with particular rights: the root folder cannot be writable!
  • Folder / [root = /var/www/user1] => 555
    • Folder www [ /var/www/user1/www ] => 755
    • Folder docs [ /var/www/user1/docs ] => 755
In vsftpd.conf we have chroot_local_user=YES so the user can’t see anything outside of his folder. To him, the server looks like this:
login ftp vsftpd chroot


So just run these commands:
 
mkdir /var/www/user1
chmod -w /var/www/user1
mkdir www/user1/www
chmod -R 755 /var/www/user1/www
chown -R vsftpd:nogroup /var/www/user1

The /var/www/user1 folder HAS TO exist or connection will fail.

Right now you can try to connect with your FTP client and it will succeed! If it doesn’t you can check the troubleshooting part.

8. Create an Admin user to access the entire server

To create an admin user we need to register a new user with htpasswd.
Before we do so, I’ll advise you to check into the /etc/ftpusers file that define certain users that are not allowed to connect with ftp. I think it’s only for local users and not virtual users but just in case don’t choose a name contained in this file. Let’s be honest, vsftpd is complicated enough!
sudo htpasswd -d /etc/vsftpd/ftpd.passwd theadmin

Now we need to add a new line into /etc/vsftpd.conf
chroot_list_enable=YES

This means that your user will be placed into their folder (as a jail) EXCEPT users in the /etc/vsftpd.chroot_list

Let’s create this file and add our user, the file is a simple line containing “theadmin”. Add one user per line. That means you DON’T need to create a /var/www/theadmin folder, the user will login and start in

/home/vsftpd.
Restart the server and you’re done !

Troubleshooting

Here are some errors I encountered.

500 OOPS: vsftpd: refusing to run with writable root inside chroot ()

Your root directory is writable, this is not allowed. Check part 7 for more information, you need to create a 555 root and 755 subfolders

500 OOPS: cannot change directory:/var/www/theadmin if the folder doesnt exist

The /var/www/$USER folder doesn’t exist, create it with the correct rights (not writable) or add the user into the /etc/vsftpd.chroot_list (see part 8). Don’t forget to restart the server.

htpasswd: cannot create file /etc/vsftpd/ftpd.passwd

The /etc/vsftpd/ folder has to be existing, htpasswd won’t create it.

vsftpd restart or stop error: “restart: Unknown instance”

This means you can’t start the deamon even if you have success message with /etc/init.d/vsftpd start. It doesn’t start because your configuration is wrong. Start the tutorial again.

Friday, July 24, 2015

Mount S3 Bucket in Ubuntu EC2


Execute command “apt-get update”. 
Install Prerequisite using following command
a.      apt-get install build-essential git libfuse-dev libcurl4-openssl-dev libxml2-dev mime-support automake libtool
b.      apt-get install pkg-config libssl-dev

  Download and Install s3fs using following command.
a.      wget https://s3fs.googlecode.com/files/s3fs-1.74.tar.gz (use latest version)
b.      tar xzf s3fs-1.74.tar.gz (change according to your version)
c.       cd s3fs-1.74 (change directory to extracted s3fs version)
d.      ./configure
e.      make
f.        make install

     Setup Access Key using following command
a.      echo AWS_ACCESS_KEY_ID:AWS_SECRET_ACCESS_KEY > ~/.passwd-s3fs
                                                              i.      AWS_ACCESS_KEY_ID = your S3 access key ID
                                                            ii.      AWS_SECRET_ACCESS_KEY = your S3 Secret Key
    Change Permission on the file
a.      chmod 600 ~/.passwd-s3fs  (Mandatory don’t change value)

      Check your ~/.passwd-s3fs file detail using following command and make sure the key is represented must be valid.
a.      cat  ~/.passwd-s3fs
     Mount S3 Bucket using following Command
a.      mkdir /tmp/cache
b.      mkdir /mnt/BucketS3
c.       chmod 777 /tmp/cache /mnt/BucketS3
d.      s3fs -o use_cache=/tmp/cache <your S3 bucket name> /mnt/BucketS3

      You are done, execute following command to list out the file in mounted drive .
a.      ls –l  /mnt/BucketS3/

Tuesday, July 21, 2015

FTP users Isolated to their Home directory in IIS


  1.   Create IIS FTP sites. 
  2.  Point out the Physical directory to c:\inetpub\ftproot.
  3.  Enable Basic Authentication.
  4.  Select the FTP isolation from the menu as below              .


  1.  Create FTP user group in Computer Management.
  2. Create Physical Folder on Drive. (e.g  d:\FTPData).
  3.  Create Virtual Directory LocalUser under your FTP site (Mandatory).
  4. Set FTP authorization for FTP user on Localuser  “Read”.
  5. Set FTP authorization for each individual user on their respective virtual directory listed under LocalUser directory to “Read”,”Write”.